In This Article
You’ve certainly heard about Bitcoin. It’s 2026, and the topic is simply unavoidable. Whether it was on the evening news, in a casual conversation with friends, or while scrolling through your favorite social media feed, Bitcoin has come up. You might already know that Bitcoin is a type of digital money, or “cryptocurrency,” and that early investors have seen its value rise dramatically over the years. But beyond the hype and headlines, what exactly is Bitcoin? How does it actually work, and why do so many experts and enthusiasts believe it could fundamentally change the way we think about money?
Here at 99Bitcoins, our mission is to make a complex subject easy to understand. In this beginner-friendly guide, we’ll explore what Bitcoin is, why it was created, how it operates, and why it continues to spark such intense debate and excitement. No technical jargon, no complicated programming language, just a straightforward explanation of Bitcoin in plain English, and how it may be shaping the future of money and finance.
A Video Guide to Bitcoin
Bitcoin In A Nutshell
What is BTC? Bitcoin is the first decentralized digital currency. All Bitcoin transactions are documented on a virtual ledger called the blockchain, which is accessible for everyone to see. Bitcoin gives you complete control over your money, unlike other assets you own, which are regulated by banks and governments. As Bitcoin gains more popularity, more and more places accept it as a payment method.
Important: Bitcoin and other cryptocurrencies are high-risk assets. Prices can change quickly and dramatically. You can lose some or all of the money you put in.
This guide is for educational purposes only and is not financial advice. Never invest money you can’t afford to lose, and always do your own research.
Bitcoin Quick Facts
| Feature | Bitcoin |
|---|---|
| Launched | 2009 |
| Creator | Satoshi Nakamoto (unknown person or group) |
| Maximum Supply | 21,000,000 BTC |
| Block Time | ~10 minutes |
| Network Type | Decentralized |
| Transactions | Public & transparent |
| Control | No central authority |
What is Money?
Before we talk about Bitcoin, I need to take a moment and talk about money. What is money exactly?
At its core, money represents value. Throughout history, value has taken many forms, and people have used a lot of different materials to represent money. Salt, wheat, shells, and, of course, gold have all been used as a medium of exchange.
However, in order for something to represent value, people have to trust that it is indeed valuable and will stay valuable long enough for them to redeem that value in the future.
Paper Money

Up until a hundred years ago or so, we always trusted in someTHING to represent money. However, something happened along the way, and we’ve changed our trust model from trusting someTHING to trusting in someONE.
Over time, people found it too cumbersome to walk around the world carrying bars of gold or other forms of money, so paper money was invented.
Here’s how it worked: a bank or government would offer to take possession of your bar of gold, let’s say, worth $1,000, and in return, that bank would give you receipt certificates, which we call bills, amounting to $1,000.
Not only were these pieces of paper much easier to carry, but you could spend a dollar on a cup of coffee and not have to cut your gold bar into a thousand pieces. And if you wanted your gold back, you simply took $1,000 in bills back to the bank to redeem them for the actual form of money, in this case, that gold bar, whenever you needed…
And so, paper began its use as money as an instrument of practicality and convenience.
However, as time progressed, and due to macroeconomic changes, the bond between the paper receipt and the gold it stands for was broken.
Now, the path that led us away from the gold standard is extremely complex, but suffice it to say that governments told their people that the government itself would be liable for the value of that paper money. Basically, we all said, “Let’s just forget about gold and trade paper instead.”
So, people continued to trade with receipts that were backed by nothing but the government’s promise.
And why did it continue to work? Well, because of trust. Even though there is no actual commodity backing paper money, people trusted the government, and that’s how fiat money was created.
Fiat Money
Fiat is a Latin word that means “by decree.” This means that the dollars or euros or any other currency, for that matter, have value because the government orders it to. It’s what is known as “legal tender”—coins or banknotes that must be accepted if offered as payment.
So, the value of today’s money actually comes from a legal status given to it by a central authority, in this case, the government. And so the trust model has changed, from trusting someTHING to trusting someONE (in this case, the government).
Fiat money has two main drawbacks:
- It is centralized: You have a central authority that controls and issues it. In this case, the government or central bank.
- It is not limited by quantity: The government or central bank can print as much as they want whenever needed and inflate the money supply in the market. The problem with printing money is that, because you’re flooding the market with more money, the value of each dollar drops, so your own money is worth less. When you see prices rising throughout the years, it’s not necessarily that prices are rising as much as the purchasing power of your money is dropping. You need more dollars to buy something that used to “cost less.”
Transitioning to Digital Money
Once fiat money was in place, the move to digital money was pretty simple. We already have a central authority that issues money, so why not make money mostly digital and let that authority keep track of who owns what?
Today, we mainly use credit cards, wire transfers, PayPal, and other forms of digital money. The amount of physical money in the world is almost negligible and is getting smaller with each passing year that passes.
So, if money today is digital, how does that even work? If we have a file that represents a dollar, what’s to stop us from copying it a million times and having a million dollars? This is called the “double-spending problem”.
The solution that banks use today is a “centralized” solution—they keep a ledger on their computer, which keeps track of who owns what. Everyone has an account, and this ledger keeps a tally for each account. We all trust the bank, and the bank trusts its computer, so the solution is centralized on this ledger in this computer.
But what is the role of Bitcoin in 2026?
In comments exclusively shared with 99Bitcoins, Agne Linge, Head of Growth at WeFi, explains:
“Well, Bitcoin now acts more like digital gold than everyday currency: people hold it as an inflation hedge and DeFi collateral, while stablecoins (and Lightning rails) are what most of us actually spend. Until fees and volatility fall further, its main role will stay long-term savings rather than “coffee money”.”
You may not know this, but there were many attempts to create alternative forms of digital currencies. However, none were successful in solving the double-spending problem without a central authority.
Centralized Money
Whenever you give anyone control over the money supply, you’re giving them enormous power, and this creates three major issues:
Corruption
Power corrupts, and absolute power corrupts absolutely. When banks have a mandate to create money or value, they basically control the flow of value in the world, which gives them almost unlimited power.
A small example of how power corrupts can be seen in Wells Fargo’s scandal, where employees secretly created millions of unauthorized bank and credit card accounts in order to inflate the bank’s revenue stream without their customers knowing about it for years.
Mismanagement
If the central authority’s interest isn’t aligned with the people it controls, there may be a case of mismanagement of the money. For example, printing a lot of money in order to save a certain bank or institution from collapsing, as happened in 2008.
The problem with printing too much money is that it causes inflation and basically erodes the value of the citizens’ money.
One extreme example of this is Venezuela, where the government has printed so much money, and the value of it has dropped so much that people are no longer counting money but are weighing it instead.
Control
You are basically giving away all control of your money to the government or bank. At any point in time, the government can decide to freeze your account and deny you access to your funds. Even if you use only cold, hard cash, the government can cancel the legal status of your currency, as was done in India a few years back.
This was the state of things until 2009. Creating an alternative to the current monetary system seemed like a lost cause. But then, everything changed.
What is Bitcoin?
In October 2008, a document was published online by someone calling themself Satoshi Nakamoto. The document, also called a whitepaper, suggested a way of creating a system for a decentralized currency called Bitcoin.
This system claimed to create digital money that solved the double-spending problem without the need for a central authority.
At its core, Bitcoin is a transparent ledger without a central authority, but what does this confusing phrase even mean?
Well, let’s compare Bitcoin to the bank. Since most money today is already digital, the bank basically manages its own ledger of balances and transactions. However, the bank’s ledger is not transparent, and it is stored on the bank’s main computer. You can’t sneak a peek into the bank’s ledger, and only the bank has complete control over it.
Bitcoin, on the other hand, is a transparent ledger. At any point in time, I can sneak a peek into the ledger and see all of the transactions and balances that are taking place. The only thing you can’t figure out is who owns these balances and who is behind each transaction.
This means Bitcoin is pseudo-anonymous—everything is open, transparent, and trackable, but you still can’t tell who is sending what to whom.
Let’s explain this with an example. Below, you can see certain rows from Bitcoin’s ledger. We can see that a certain Bitcoin address sent 10,000 Bitcoins to another Bitcoin address in May of 2010.
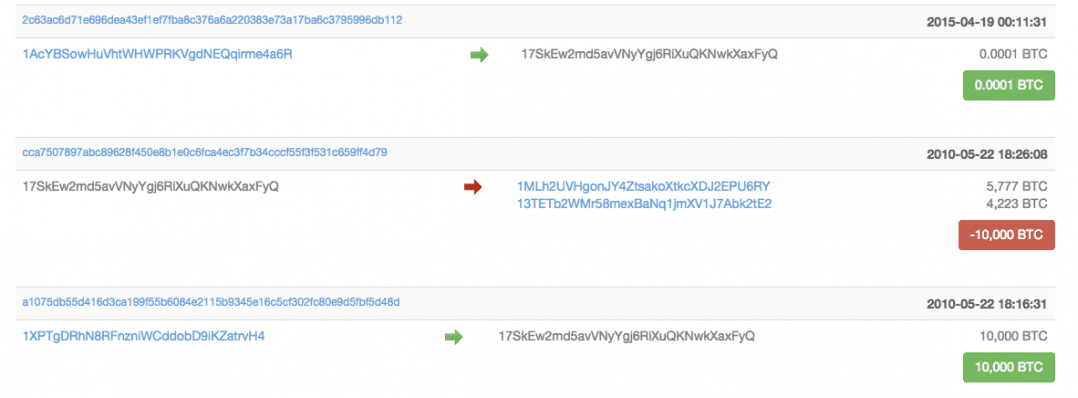
This specific transaction is the first purchase that was ever made with Bitcoin, and it was used to buy two pizzas by a guy named Laszlo. Laszlo published a post back in 2010 asking for someone to sell him two pizzas in exchange for 10,000 Bitcoins. Well, someone did, and now the price of these two pizzas is worth well over $1 billion today. As a result of that transaction, May 22 is now celebrated as Bitcoin Pizza Day from then on.
Understanding Bitcoin (BTC)
You might be wondering: “What is BTC?” Well, BTC is the common abbreviation for Bitcoin, and is the ticker unit. Bitcoin was designed as a new form of money that operates outside the control of banks and governments. Today, BTC is recognized both as a currency for peer-to-peer (P2P) transactions and as a long-term store of value.
How Bitcoin’s Blockchain Works
To understand Bitcoin, you need to understand blockchain technology. A blockchain is a digital ledger that records every transaction ever made. Instead of being stored on a single server, copies of this ledger exist on thousands of computers across the globe. These computers constantly verify and update transactions, ensuring that the system is secure and transparent.
Because no single authority controls the blockchain, Bitcoin is considered decentralized. If someone wanted to hack or shut down Bitcoin, they would need to take over thousands of computers at once, a nearly impossible task.
What is a Bitcoin?
What is Bitcoin? First things first, Bitcoin is digital. This means there’s nothing physical that you can touch in Bitcoin. There are no actual coins; there are only rows of transactions and balances. When you “own” Bitcoin, it means you own the right to access a specific Bitcoin address record in the ledger and send funds from it to a different address.
Simply put, Bitcoin is digital money, most often referred to as digital gold. It is both a digital currency and a digital store of value.
What Is a Bitcoin Wallet?
A Bitcoin wallet is a tool that lets you store, send, and receive Bitcoin.
Important thing to understand: Your Bitcoin is not stored inside the wallet; the wallet stores your private keys, which prove ownership.
What Makes Bitcoin Unique
Bitcoin is purely digital. There are no physical coins or notes; instead, ownership is recorded on the blockchain. When you hold Bitcoin, what you truly hold are private keys, secure digital codes that give you the right to send or receive BTC from a specific blockchain address.
Many call Bitcoin “digital gold” because it combines the qualities of money (you can spend it) with the qualities of a store of value (you can hold it long-term as a hedge against inflation).
How Fast Are Bitcoin Transactions?
Bitcoin transactions usually take about 10 minutes to confirm. Sometimes, they can take longer during busy periods.
| Network | Avg. Confirmation Time |
|---|---|
| Bitcoin | ~10 minutes |
| Litecoin | ~2.5 minutes |
| Ethereum | Varies |
This is one reason why some people use Bitcoin more as a store of value rather than for everyday payments.
Why Bitcoin Matters
Bitcoin is big news because it represents the first real alternative to the traditional financial system. Unlike fiat currencies such as the dollar or euro, Bitcoin cannot be printed at will, and no government or bank has control over it.
The shift is similar to what happened with the internet. Before the web, access to information was centralized, controlled by a handful of major outlets. Once information became decentralized, anyone could share and consume knowledge globally at the click of a button.
Bitcoin applies the same principle to money. By decentralizing financial transactions, it opens the door to a borderless, censorship-resistant monetary system. Many see it as the internet of money, a revolutionary step in how humans store and transfer value.
Bitcoin’s Impact on the World Economy
Bitcoin is becoming more widely accepted as a hedge against currency devaluation and inflation, especially in areas with shaky financial institutions. Thanks to its decentralized structure, people can avoid traditional banking infrastructures, enabling the unbanked to have access to financial inclusion. A deflationary element is also introduced by Bitcoin’s fixed supply, in contrast to fiat currencies that are susceptible to inflationary pressures.
Businesses and financial institutions are incorporating Bitcoin into their services and portfolios, indicating an increase in institutional adoption. This pattern represents a change in perceptions of Bitcoin as a valid part of the global economy as well as a digital asset.
Bitcoin Compared to Banks
Here is why Bitcoin is different than the current banking system.
Complete Control Over Your Money
With Bitcoin, you and you alone can access your funds (how you actually do this will be explained in a later video). No government or bank can decide to freeze your account or confiscate your holdings.
Cutting the Middlemen
This means that in many cases, Bitcoin is cheaper to use than traditional wire transfers or money orders. Also, unlike fiat currencies, Bitcoin was designed to be digital by nature. This means you can add additional layers of programming on top of it and turn it into “smart money,” but more on that in later videos.
Free for All
Bitcoin opens digital commerce to over a billion people worldwide who don’t have access to the current banking system. These people are unbanked or underbanked because of where they live and where they were born.
Bitcoin is truly banking the unbanked. All you need to get started buying, selling, sending, and receiving Bitcoin is access to the internet, via a smartphone or a computer, and you’re off to the races.
Today, with a mobile phone and a click of a button, the previously unbanked can start trading using Bitcoin, with no permission needed.
Bitcoin vs. Traditional Money At a Glance
| Feature | Bitcoin | Bank Money |
|---|---|---|
| Controlled By | Network users | Governments |
| Supply Limit | Fixed (21M) | Can increase |
| Transparency | Public ledger | Private |
| Borderless | Yes | Limited |
Getting Started with Bitcoin
Now, we will cover the most straightforward steps to getting started with Bitcoin. Of course, there is much more detail you can explore, including concepts such as Ordinals, Runes, and DeFi on Bitcoin, but for the average person just starting with Bitcoin, these three steps should help. If you prefer a video format, you can check out our video below:
Step 1: Educate Yourself
Before doing anything else, you should start by educating yourself about what Bitcoin is: why it was created, what gives it value, and what separates Bitcoin from every other cryptocurrency.
Understanding the answers to these questions is crucial to helping you make better investment decisions. Now, we may be a little biased, but we think a good place to embark on the journey of cryptocurrency for beginners would be our own free, seven-day Bitcoin crash course.
Step 2: Try a Transaction
Once you’ve gotten your basic education, it’s time to get some hands-on experience by conducting your first Bitcoin transaction. For first-timers, we suggest downloading a free software crypto wallet like Best Wallet and buying just a small amount of Bitcoin for the experience. Some reputable places that will sell you small amounts of Bitcoin are directly within Best Wallet for the easiest method, or signing up for an exchange such as Binance, MEXC, or Kraken.
Going through your first Bitcoin transaction will put into practice what you’ve learned in our course and will give you a better sense of how to make your first purchase, how to find your Bitcoin address, how long it takes for a transaction to be confirmed, and more.
Step 3: Stay Informed
Now that you’ve finished your Crypto for Beginners bootcamp, it’s time to stay up to date with the latest news and updates so you can understand and anticipate market movements. Along with our YouTube channel, there are several other good resources you should bookmark and subscribe to.
Find out more about Bitcoin:
Bitcoin Security Tips for Beginners
If you only remember one section, make it this one.
✅ Never share your private keys or recovery phrase.
✅ Use hardware wallets for long-term storage.
✅ Enable two-factor authentication (2FA).
❌ Avoid “guaranteed returns”, as they are most probably scams.
❌ Don’t store large amounts on exchanges.
Pro Tip: If someone asks for your recovery phrase, it’s always a scam.
Conclusion
Bitcoin isn’t just a digital currency; it represents a completely new way of thinking about what money is, who controls it, and how value moves across the world. By running on a decentralized, transparent network secured by thousands of independent nodes and miners, Bitcoin allows anyone to send and store value without relying on banks, governments, or payment processors. This shift from trust in institutions to trust in code is why many see Bitcoin as “digital gold” and a hedge against inflation, censorship, and financial instability.
Whether you’re interested in using Bitcoin for payments, investing in it as a long-term store of value, or simply understanding the technology that powers it, taking the time to learn how Bitcoin works is a crucial first step in navigating the future of finance.
See also:
- Can Quantum Computers Hack Bitcoin: Are You Ready?
- De-dollarization: What It Means for Bitcoin & Stablecoins?
- Bitcoin Futures: BTC Trading Guide For 2026
- Blockchain for Beginners
- What are Public & Private Keys in Crypto?
- What is Fidelity Wise Origin Bitcoin Fund (FBTC)?
- Risks Behind MicroStrategy’s Bitcoin Bet Explained
FAQs
Who accepts Bitcoin?

Today, there are several merchants online and offline that accept Bitcoin. You can order a flight or book a hotel with Bitcoin if you like. There are even Bitcoin debit cards that allow you to pay at almost any store with your Bitcoin balance. However, the road toward acceptance by the majority of the public is still a long one.
How does Bitcoin work?
In a nutshell, Bitcoin works by updating a ledger of transactions (aka the blockchain). Each computer that participates in the Bitcoin network holds a copy of this ledger and verifies every transaction going through it.
Can Bitcoin be converted to cash?
Yes. Several sites like HodlHodl will allow you to find sellers of Bitcoin who accept cash. Additionally, there are Bitcoin ATMs that accept bills and dispense Bitcoin in return.
If you’re looking to convert Bitcoin to fiat currency but not necessarily cash (i.e., coins and bills), you can find a variety of trustworthy Bitcoin exchanges online.
Which hashing algorithm is Bitcoin using?
Bitcoin blockchain uses a SHA-256 hashing algorithm for transaction verification and block creation.
Is Bitcoin safe?
The Bitcoin network itself has never been hacked. However, users can lose funds through scams, poor security, or lost keys.
Can I lose money with Bitcoin?
Yes. Bitcoin is volatile, and prices can go down as well as up.
Do I need a lot of money to start?
No. Bitcoin can be bought in small fractions.
Is Bitcoin legal?
In most countries, yes, but regulations vary. Always check your local laws.
Why you can trust 99Bitcoins
Established in 2013, 99Bitcoin’s team members have been crypto experts since Bitcoin’s Early days.
Weekly Research
100k+Monthly readers
Expert contributors
2000+Crypto Projects Reviewed