In This Article
- Don’t like to read? Watch our Video Guide Instead
- Paper Wallet Guide Summary
3.Bitcoin Paper Wallet Generator Guide: Advanced Way to Create Paper Wallet
- The necessary tools
- Step 1 - Install Ubuntu on your flash drive
- Step 2 - Go offline and test the printer
- Step 3 - Run your computer using Ubuntu from your flash drive
- Step 4 - Setup a printer on the Ubuntu operating system
- Step 5 - Open BitAddress and print your new paper wallet
- Why is this process considered secure?
- 7. Conclusion
Before hardware wallets and mobile apps dominated the crypto storage scene, there was the humble paper wallet, one of the earliest and simplest ways to keep your Bitcoin or other cryptocurrencies safe. In the early days of crypto, when hacks and exchange failures were all too common, paper wallets gave users the peace of mind of full self-custody, literally taking their private keys offline and printing them onto paper.
Even today, paper wallets remain an ultra-secure cold storage method for long-term holders who want to remove their coins entirely from the internet. By storing your private and public keys on paper, you eliminate the risk of online attacks, malware, or exchange insolvencies. They’re low-tech, affordable, and surprisingly effective if handled correctly.
Don’t like to read? Watch our Video Guide Instead
Paper Wallet Guide Summary
Here’s the short way for creating a BTC paper wallet:
- Go to BitAddress
- Generate a random private key
- Click “paper wallet”
- Choose how many copies you’d like to print out
- Encrypt the wallet with a BIP38 password (optional)
- Print and enjoy 🙂
That’s how to create a crypto paper wallet in a nutshell. If you want a detailed explanation about the process and how to make sure it’s more secure, keep on reading.
1. What is a Bitcoin Paper Wallet?
A private key (or seed phrase) is like the password for a Bitcoin wallet. It should be kept offline in what is known as Cold Storage. A private key is a long, confusing string of random characters, while a seed phrase is a set of 24 random words that allows you to restore your private key.
Simply put, a paper wallet is a piece of paper that has your private key written on it. This makes sure that your private key is kept offline, away from the hands of hackers.
Usually this process will be done for the purpose of storing large amounts of Bitcoin. It’s considered much safer than keeping coins on a hot wallet (i.e. a wallet that is connected to the internet).
When storing your Bitcoins on a paper wallet you can only load funds to the wallet. If you want to send those funds you’ll need to import or sweep the paper wallet’s private key to a software wallet in order to get access to your coins.
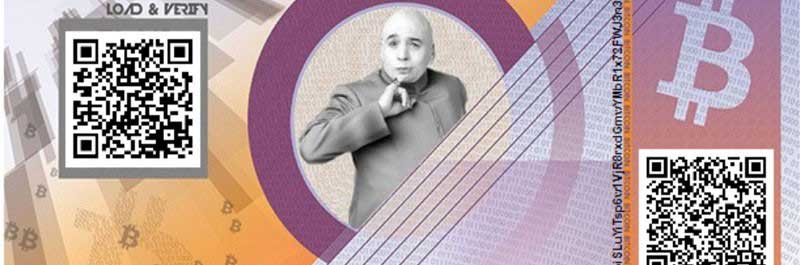
Here’s an example of a BTC paper wallet:
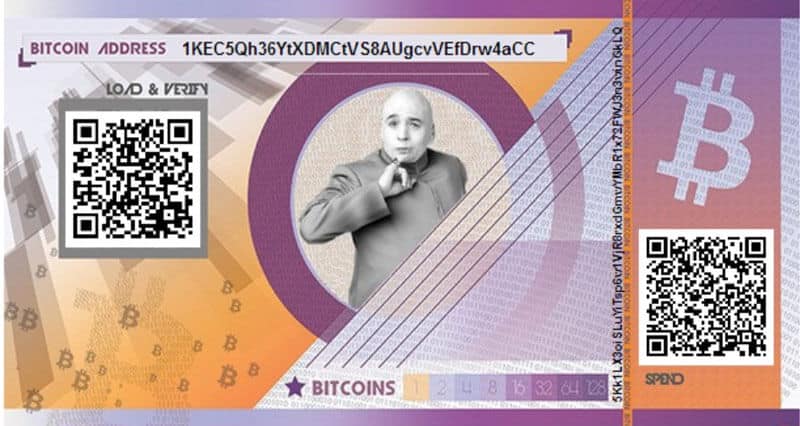
The Bitcoin address is written on top while the private key is written on the right side
Scenarios Where Paper Wallets Might Be Useful
A paper crypto wallet may not be ideal for everyone, but it shines in certain scenarios:
- Long-term Bitcoin Storage: If you’re planning to hold Bitcoin for years without touching it, a paper wallet ensures your private key remains offline.
- Gifting Bitcoin: Want to give Bitcoin as a present? Printing a paper wallet allows you to hand over crypto in a tangible, gift-like way.
- Avoiding Exchange Risks: Holding Bitcoin on an exchange means trusting a third party. A paper wallet eliminates that risk.
- Storing Crypto in Areas with Limited Internet Access: In regions with unstable internet connections or high government surveillance, a paper wallet provides a secure alternative.
These use cases highlight why, despite their drawbacks, paper wallets remain a valuable tool for specific crypto users.
2. The Simple Way to Create a Paper Wallet
Creating a cryptocurrency paper wallet is pretty easy, the trick is to secure it correctly. If you just want to see the process in action and don’t care that much about security you can follow this process:
- Head over to BitAddress (an open source software for producing paper wallets).
- Move your mouse around / enter random text to help generate a random private key.
- Once done, choose “Paper Wallet” and print out the results. Your Bitcoins can then be stored through the public address on the left.
- You can also add a passphrase to encrypt the paper wallet for additional protection by ticking the BIP38 encryption box.
That’s it! The process literally takes 30 seconds and you have your own paper wallet. You can generate as many addresses as you’d like by entering the amount on ‘Addresses to generate’. The addresses will all be unique and different.
Why is this considered non-secure?
First of all, since you’re connected to the web while doing this, someone may have the ability to see what’s going on on your screen.
Second, if someone was able to hack BitAddress for example, they can collect all of the private keys that people created on the site.
Last but not least, if you’re using Windows you may have been infected with Malware which you are unaware of. This may put your private key at risk as people may be monitoring your actions.
3.Bitcoin Paper Wallet Generator Guide: Advanced Way to Create Paper Wallet
If you’re really serious about safeguarding your Bitcoins you have to make sure you create an ultra secure paper wallet for cryptocurrency. The process is a bit tedious but if we’re talking about a large amount of money, it’s worth the effort.
The necessary tools
This process is designed for PCs (a Mac tutorial will be coming soon but for now you can get the general idea). Here’s what you’ll need to download to your computer before getting started:
Ubuntu download (latest version) – The operating system we’ll use
LiLi download (latest version) – A software to install Ubuntu on our flash drive
BitAddress download – The software to create the paper wallet
You will also need a brand new (or completely formatted) flash drive.
Step 1 – Install Ubuntu on your flash drive
IMPORTANT: This step will erase everything you have on the flash drive.
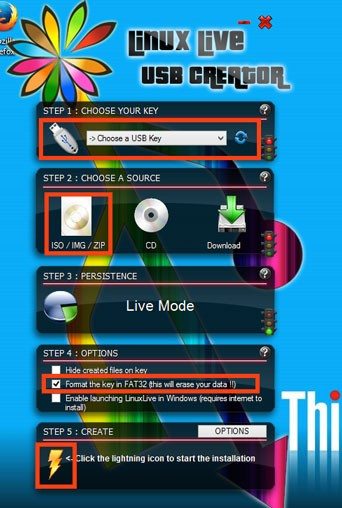
- Open up LiLi and insert your flash drive.
- Make sure you’ve selected the correct drive (click refresh if drive isn’t showing).
- Choose “ISO/IMG/ZIP” and select the Ubuntu ISO file you’ve downloaded in the previous step.
- Make sure only “Format the key in FAT32” is selected.
- Click the lightning bolt to start the format and installation process
After the process is finished, unzip the BitAdrress file you’ve downloaded in the previous step and copy it into your flash drive.
Step 2 – Go offline and test the printer
At this point you should disconnect your computer from the Internet whether it has Wi-Fi or a LAN connection. Make sure there’s no way remote access can be granted to the computer. When finished, make sure you are still able to print a test page so you’ll know your printer is functional.
Step 3 – Run your computer using Ubuntu from your flash drive
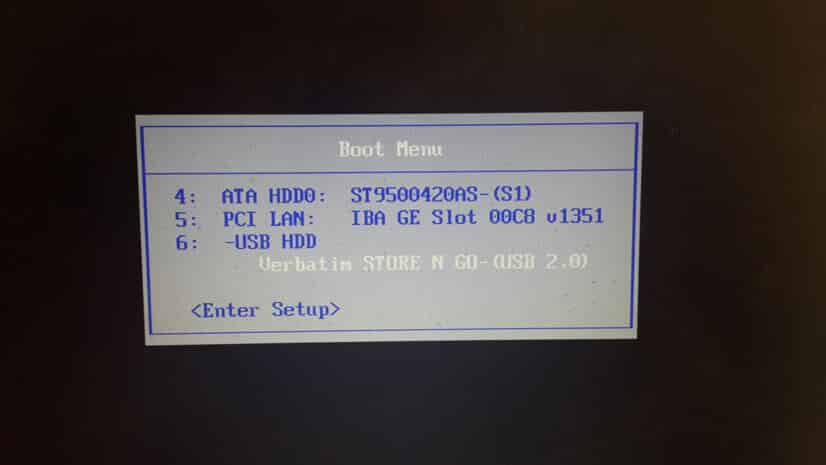
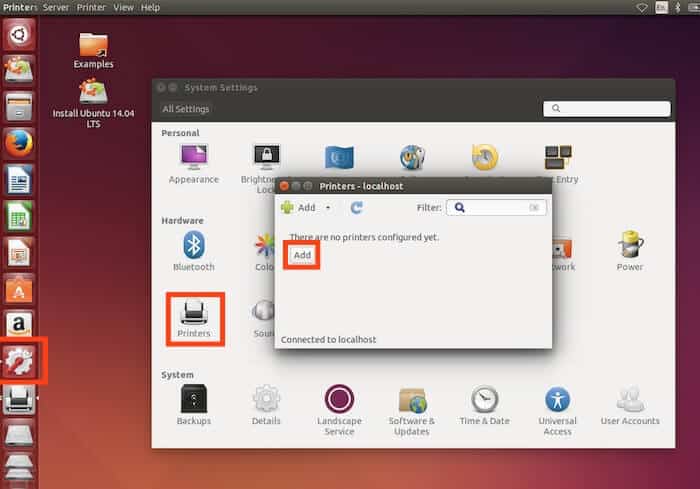
Restart your computer. Clicking F12 or F1 during the boot-up process will allow you to choose to run your operating system from your flash drive (#6 in the image below).
After the Ubuntu operating system loads you will choose the “try Ubuntu” option.
Step 4 – Setup a printer on the Ubuntu operating system
At this point you will want to set up your printer on the Ubuntu OS:
- Click on System Settings (a monkey wrench and cog wheel icon)
- Click on “Printers”
- Click on “Add”
- Add your printer
- Print out a test page
Step 5 – Open BitAddress and print your new paper wallet
The final step will be to open the copy you have of BitAddress.org and create a paper wallet locally on your machine.
- Open private browsing in FireFox (right click -> “Open a New Private Window”)
- Type in the following in the address bar: file://cdrom/bitaddress.org-master/
- Click on the link “BitAddress.org.html”

- Create your paper wallet by moving the cursor around until the number on the top right reaches 100
- Choose “Paper Wallet” from the menu
- Choose how many copies you’d like to generate
- Add BIP38 encryption (optional)
- Print out your paper wallet


Why is this process considered secure?
- You’re not connected to the Internet while producing your private key.
- You’re using an “out of the box” operating system which reduced the chance for Malware.
- You are using an offline version of BitAddress so no one can hack it.
4. Best practices for keeping your paper wallet safe
Once you have your paper wallet you can load funds to it by using the Bitcoin address on the left side. It’s important to keep the private key (on the right side) hidden and discreet.
Here are a few methods you can use to better safeguard your paper wallet:
- Get it laminated so it doesn’t tear or fade
- Keep it inside a safe or a location that only you can access
- Use a device like Cryptosteel to make it disaster proof
An advanced method includes creating several copies of the paper wallet, each holding only part of the private key or seed phrase. For example, creating three partial copies that any two of them can create the whole private key. Here’s how it should look:
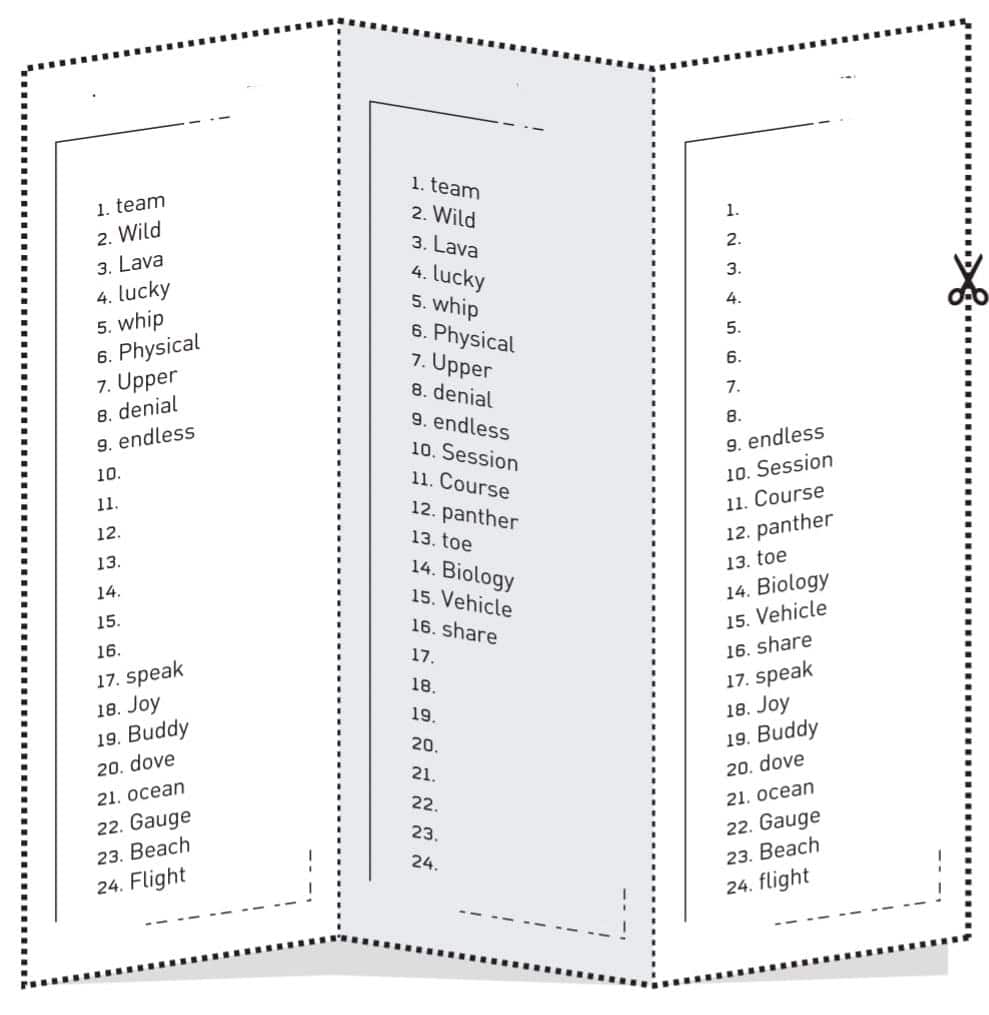
This way you can leave each copy at a different location and make it harder for someone to obtain your private key if they only stole one copy.
Potential Security Risks of Paper Wallets and How to Mitigate Them
While paper wallets offer excellent offline security, they come with their own set of risks. Here’s how to mitigate them:
- Physical Damage: Paper wallets can degrade over time due to exposure to moisture, fire, or general wear and tear.
Solution: Laminate your wallet or store it in a fireproof and waterproof safe. - Loss or Theft: Since a paper wallet is a physical object, it can be easily lost or stolen.
Solution: Store multiple copies in separate, secure locations. If concerned about theft, consider a split-key storage method where each copy contains only part of the private key. - Compromise During Creation: If generated on an online device, a hacker could intercept your private key.
Solution: Always generate a paper wallet offline, following the advanced secure method outlined above. - Fading Ink: If printed with regular ink, it can fade over time, making it unreadable.
Solution: Use high-quality laser printing or engrave your key onto metal.
By taking these precautions, you can significantly reduce the risks associated with paper wallets while benefiting from their offline security.
5. Alternative to Bitcoin Paper Wallets : Best Wallet
While paper wallets are a secure way to store Bitcoin offline, they can be cumbersome to create and manage. For users who prefer a more convenient and user-friendly option without compromising on security, software wallets like Best Wallet provide an excellent alternative. Let’s explore why Best Wallet stands out as our top choice for crypto management.

- Non-Custodial Wallet
Best Wallet ensures complete user control by storing private keys locally on your device, providing high-level security without relying on third parties. - Support for 60+ Blockchains
The wallet is compatible with major blockchain networks, including Bitcoin, Ethereum, Solana, and Binance Smart Chain, offering flexibility for diverse crypto portfolios. - Built-in DEX Aggregator
Trade and swap cryptocurrencies directly within the wallet through its integrated decentralized exchange (DEX), ensuring lower fees and quicker transactions. - Staking Aggregation
Users can earn passive income by staking their cryptocurrencies through the wallet’s aggregator, which provides access to multiple staking opportunities. - Fiat On-Ramp and Off-Ramp
Seamlessly convert between fiat currencies and cryptocurrencies with support for credit cards, bank transfers, and e-wallets. - Portfolio Management
Monitor and manage your crypto holdings in real-time with live price updates, detailed analytics, and an easy-to-use tracker. - Advanced Security Features
Best Wallet includes features like two-factor authentication (2FA), biometric verification, and encrypted private keys for enhanced safety. - Gaming Hub
Access blockchain-based games and use cryptocurrencies for in-game transactions within the wallet’s integrated gaming platform. - Presale Aggregator
Participate in early-stage crypto projects with the wallet’s presale aggregator, providing exclusive access to new tokens. - Rewards Program
Earn native $BEST tokens through daily tasks, referrals, and engagement with the wallet’s ecosystem. - Low Fees
There are no fees for storing or receiving cryptocurrencies, and DEX swaps are available without additional markups, aside from standard network fees. - Custom Token Support
Add and manage tokens across supported networks, catering to both mainstream and niche cryptocurrency users. - User-Friendly Interface
Designed for all users, the wallet combines simplicity for beginners with advanced tools for experienced traders. - Mobile Compatibility
Available as an iOS and Android app, with a browser extension and desktop application under development.
In the previous section, we explained that setting up a paper Bitcoin wallet involves multiple steps. It includes going offline and using specialized tools, which can be time-consuming. Now let’s compare that to setting up Best Wallet. Here is why it is quick and straightforward:
Step 1 – Download the App
Go to the App Store (iOS) or Google Play Store (Android) and search for “Best Wallet.” Download and install the app on your device.

Step 2 – Create a New Wallet
Open the app, select “Create New Wallet,” and follow the prompts to set up your account.

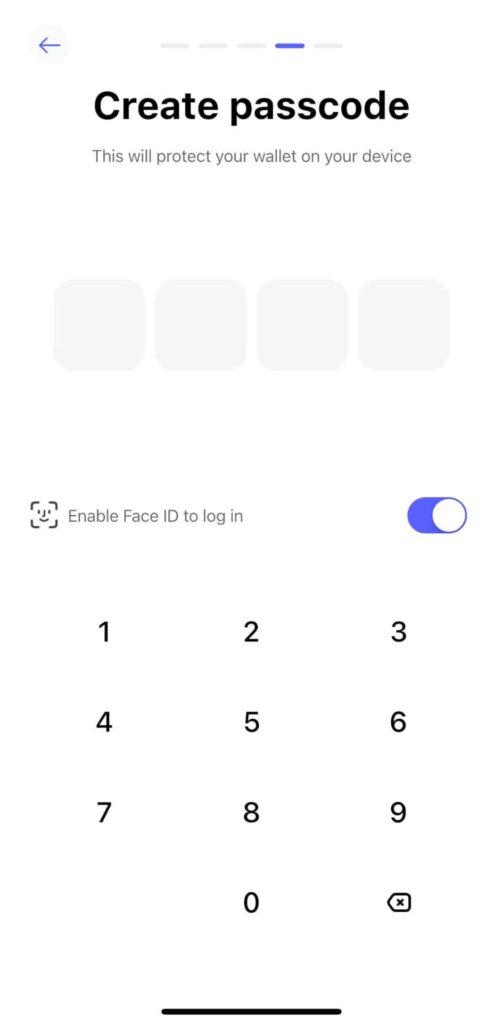
Step 3 – Secure Your Wallet
Set up a strong PIN or enable biometric security (fingerprint or facial recognition) for added protection.
Step 4 – Backup Your Seed Phrase
Write down the 12- or 24-word backup phrase provided. Store it safely offline, as it is the only way to recover your wallet if you lose your device.

Step 5- Fund Your Wallet
Add funds by transferring cryptocurrency from another wallet or purchasing crypto through the app using supported payment methods.

Once the setup is complete, explore the features that Best Wallet offers. Start using the wallet’s features like DEX trading, staking, and portfolio tracking to manage your crypto efficiently.
Comparison Table: Paper Wallets vs. Other Wallet Types
| Wallet Type | Security | Ease of Use | Risk of Loss | Best For |
|---|---|---|---|---|
| Paper Wallet | High (if created securely) | Low (requires manual setup) | High (can be lost, damaged, or stolen) | Long-term storage, gifting |
| Hardware Wallet | Very High | Moderate | Low (backup seed needed) | Storing large amounts of crypto securely |
| Software Wallet | Moderate | High (easy to use) | Moderate (depends on device security) | Daily transactions, frequent access |
| Exchange Wallet | Low | Very High | Low (unless the exchange is hacked) | Beginners, active traders |
7. Conclusion
If you’re serious about Bitcoin and want to store large amounts of coins you need to get some form of cold storage. If you can spare some more, I suggest using a hardware wallet, but if you can’t afford it or want to avoid it for any other reason, a paper wallet is the way to go.
My personal advice is that if you do end up using a paper wallet, take the time to go over the secure advanced method and create an ultra secure one. The extra 30 minutes or so you’ll invest in the process may end up to prove worthwhile.
FAQs
How Do You Import a Paper Wallet into a Software Wallet?

When the time comes and you want to send Bitcoins from your paper wallet you’ll need to import the private key or seed into a software wallet. While each wallet is different in its process the general idea remains the same:
- Download a software wallet like Best Wallet
- Click on “New Wallet”
- Import and existing seed / private key
- Scan the QR for the private key of your paper wallet (this is much easier than typing the whole key)
Important! Do not do this process on a wallet that is already holding funds as it may override the current private key. It’s best to download a new wallet / app and import for this process.
How to create Bitcoin wallet?
You can download software-based Bitcoin wallets such as Best Wallet for free on your smartphone. If you are looking for Bitcoin cold wallet for maximum security you will have to buy them from companies such as Ledger, Trezor and ELLIPAL. Or, you can choose to create a Bitcoin paper wallet yourself.
How to create a paper wallet for any cryptocurrency?
Go to a paper wallet generator website that supports the cryptocurrency you want to use. Generate a random private key. Print out copies of your private keys.
How to make paper wallet?
Go to a paper wallet generator website that supports the cryptocurrency you want to use. Generate a random private key. Print out copies of your private keys. For Bitcoin paper wallets, visit www.bitaddress.org.
How to make a cold wallet?
Cold wallets are hardware devices that store private keys that give you access to your cryptocurrencies. You will have to buy cold wallets from developer such as Ledger, Trezor and ELLIPAL.
How to store bitcoin on paper?
You will have to note down the private keys that give access your bitcoin wallet address on a piece of paper and secure it.
How to store bitcoin paper wallet?
Since your paper wallet will contain the private keys that give the holder access to your cryptocurrency, you should store your Bitcoin paper wallet in a secure and private place. Never share the location of your paper wallet with someone you can’t trust. You can also make secure copies of your paper wallet, incase you lose or misplace it.
How do I open a bitcoin account?
Anyone can open a Bitcoin wallet address. You can download a Bitcoin software wallet such as Best Wallet or buy a hardware wallet from Ledger, Trezor, and ELLIPAL. For paper wallet Bitcoin accounts, you can generate a new address on paper wallet generator sites such as Bitaddress.org.
Why you can trust 99Bitcoins
Established in 2013, 99Bitcoin’s team members have been crypto experts since Bitcoin’s Early days.
Weekly Research
100k+Monthly readers
Expert contributors
2000+Crypto Projects Reviewed