Important update: For our readers who are looking to make a profit with crypto, we recommend looking into Ethereum staking as an alternative to mining.
Ethereum mining is no longer possible; Ethereum moved into a PoS algorithm in 2022, which rendered mining obsolete. Two staking alternatives we recommend looking into are CEX.io and Binance.
The article below is kept for historical purposes and will no longer be updated.
Getting started with Ethereum Mining is pretty easy. All you need is a Graphics Processing Unit (GPU) and you can start generating Ether. In this post, I’m going to cover what Ethereum mining is in a nutshell and what you need to do to mine Ethereum profitably.
Ethereum Mining Summary
Ethereum mining is the process of maintaining the Ethereum ledger through solving complex mathematical problems. Unlike Bitcoin mining, Ethereum mining can be done with a Graphics Processing Unit (GPU) only.
How to Start Mining Ethereum
- Step 1: Install your GPUs and set up your computer
- Step 2: Get an Ethereum wallet (Mist or MyEtherWallet)
- Step 3: Join an Ethereum mining pool
- Step 4: Start mining!
Ethereum Mining in a Nutshell
At its core, Ethereum works very similarly to Bitcoin. It’s a decentralized ledger that is verified and updated by participants of the Ethereum network.
Ethereum requires mining just like Bitcoin. The only way to update a new block of Ethereum transactions is by mining that block. The best way to understand Ethereum mining thoroughly is to read (or watch) our guide on Bitcoin mining.
However, while conceptually the two are much alike, there are significant technical differences. Some are more obvious; for example, Ethereum blocks are added every 15 seconds (on average) while Bitcoin blocks are added every 10 minutes (on average). As a reward, Ethereum miners receive 2 ETH plus all transaction and code-processing fees (aka gas) contained in their block, plus a possible bonus for any uncles they include.
As for the mining algorithm, Ethereum uses a hashing algorithm known as Ethash, which is different than Bitcoin’s hashcash. Ethash is incompatible with the special hashing hardware (ASICs) developed for Bitcoin mining.
Moreover, it’s a memory-hard algorithm, meaning it’s designed to resist the development of Ethereum-mining ASICs. Instead, Ethash is deliberately best-suited to GPU mining.
Hashrate, Difficulty, and Price
Assuming the amount of hardware dedicated to Ethereum mining is rising, why aren’t blocks being mined ever more rapidly? How come the average 15-second block time remains constant?
The answer is difficulty.
By automatically adjusting the computational difficulty of solving a block, the Ethereum blockchain can maintain ~15-second intervals. You’ll notice that difficulty closely tracks hashrate.
The next obvious question is what drives changes in hashrate and difficulty in the first place?
The answer is price!
As can be seen in the image below, hashrate has followed (with some appreciable lag) the ETH price:
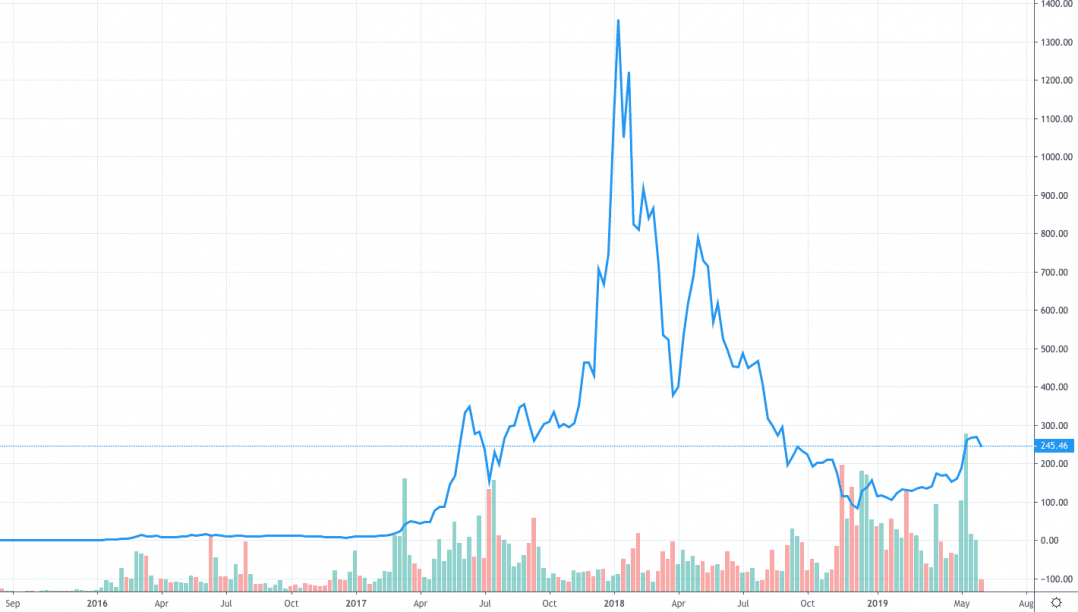
Chart of Ethereum’s US Dollar value, courtesy of Trading View
Having said all that, it’s important to know that Ethereum is planned to move from a Proof-of-Work system that requires mining to a Proof-of-Stake system that renders mining useless. It’s unclear when this change will happen exactly.
Is Ethereum Worth Mining?
Well, here are some good reasons to mine Ethereum:
- Mining can be a great way to subsidize the purchase of a new, high-end GPU.
- As Ethereum is easily traded for Bitcoins (BTC), it’s a cheap way to slowly build up a holding position in Bitcoin.
- ETH can also be sold directly for cash on several major exchanges, such as CEX.io, Kraken, Gemini, and Coinbase.
- Mining can be a cheap entry ticket to the Ethereum markets, loved by traders for their high volatility. If you’re a good and/or lucky trader, you can maximize your profits.
- Building a large ETH position now, in the Proof of Work mining phase, will enable you to earn interest on your holdings if/when Ethereum switches to a Proof of Stake.
- If you believe in the Ethereum concept (despite the failure of the DAO and doubts regarding the viability of Ethereum’s approach), you can support and gain a voice in the Ethereum network through mining.
Is Ethereum Mining Profitable?
With a clearer understanding of Ethereum mining and important concepts like Difficulty, it’s time to perform some economic calculations.
This step is very important and you should not skip it. While mining earns money, it also costs money, and if you make the wrong decisions, you may end up with negative ROI (i.e., paying more than you earn).
Luckily, we created an Ethereum mining profitability calculator, so it is fairly easy to find out if you’re going to be profitable or not.
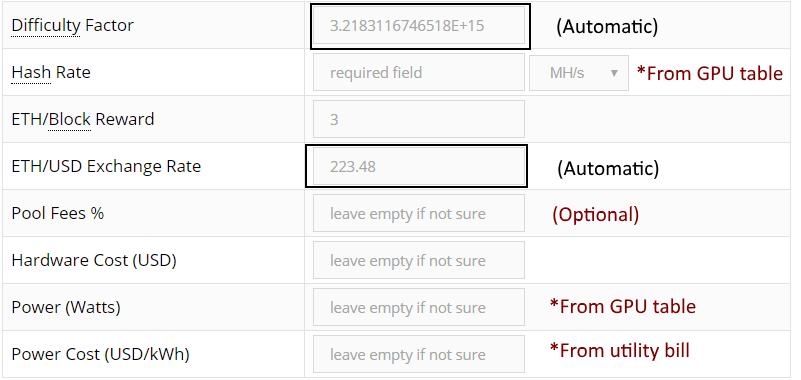
[ccpw id=”167162″]In the calculator, fill in the data as follows:
Difficulty Factor, Block reward, and ETH/USD rate: These fields are updated automatically. You can enter your own values manually to simulate scenarios.
Hashrate, Power (Watts): Use this table to find the parameters for your GPU’s make and model. Make sure the hash rate measurement is identical between the table and the calculator, i.e., MH/s, KH/s, etc.
Pool Fees % (optional): Enter your mining fees if you’re mining via a mining pool (usually run around 1% plus a 1 ETH payout fee). Leave this blank if you’re mining on your own (not recommended)
Hardware cost (USD): Put here (in USD) how much you paid (or are about to pay) for your GPU and any other mining equipment.
Power Cost (USD/kWh): Enter your electricity price, as appears on your utility bill. Use this list for the USA or this list for elsewhere in the world.
The profitability output will appear below the calculator as you enter the values:
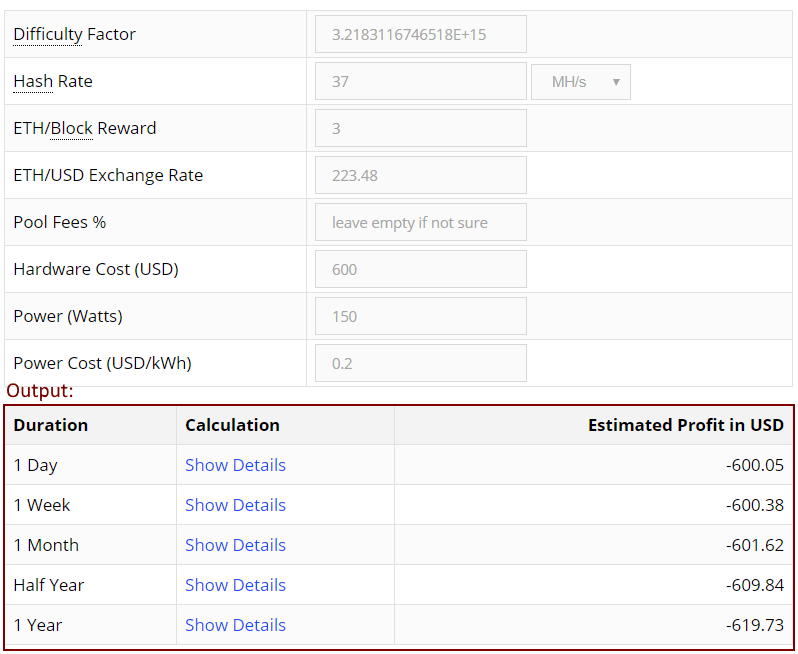
*In the example above, I used a 1080Ti GPU with a residential power cost of 20 cents per kWh, with no mining pool. As can be seen in this example, this setup will make me lose money, even after a year of mining…
Most importantly, it is crucial to understand that difficulty and price are variables, i.e., they can and will probably change significantly over time. The profitability score you get is only true to the moment of calculation.
Profitability Warning
Ethereum is scheduled to switch to a Proof of Stake model at some unspecified date, meaning it will no longer be mineable. Before any serious outlay of capital, further research into Ethereum’s prospects is warranted.
While GPUs may be set to mine other coins and their costs partially recouped through resale, GPUs depreciate rapidly. This is especially true of cards that are used for constant, intensive work of mining.
Choosing your Mining Hardware
Experimentation with various GPU selections in the calculator will reveal a card with the best price to performance to power consumption combination (expressed as MH/s per Currency Unit). Keep in mind that AMD cards outperform Nvidia for cryptocurrency mining purposes.
The card should have at least 3 GB of RAM, or it won’t be able to properly mine Ethereum. This is due to the growing DAG file (directed acyclic graph) used in the Ethereum Proof of Work hashing process.
For a complete list of Ethereum mining hardware, read this post.
Operating System Requirements
This guide covers using Windows 10 (make sure it’s 64-bit). Various distributions of Linux can be used (not covered here). Windows is the easiest to configure and get up and running fast. There is no Mac version at this time.
There could be a very lengthy post on all the hardware requirements and considerations, but to cover the important things at a high level, here are some primary considerations for building a mining rig:
- You want to get a motherboard with enough PCI-E slots to support the number of cards you are running.
- If using more than one GPU, you’ll want to get a powered PCIe riser for each additional GPU
- For Power Supplies, you want to double-check that your PSU has enough connections to support the number of GPUs you are running and enough overall wattage to support your total system power draw (and to give yourself some buffer of at least 10-15%).
- You want to get a simple, low-end CPU and at least 4GB of RAM. Make sure your motherboard, CPU, and RAM are compatible (i.e., LGA 1151 motherboards need an LGA 1151 socket CPU, and DDR4 RAM / LGA 1150 motherboards need an LGA 1150 CPU and DDR3 RAM).
- Don’t forget a power button. Pick up a simple PC power button switch, which connects to the headers of the motherboard, so you can turn your system on/off.
- A standard keyboard, mouse, and monitor are needed. If managing your rig remotely (not covered here in this beginner guide), you will want to get a headless HDMI dummy plug to plug into your rig so it boots into Windows properly for remote access.
A helpful site for identifying how many 6 or 8-pin PCI-E power connections your GPU will require is Realhardtechx.com, and to get a sense of your overall system power draw, you can use outervision.
Pro tip: If building multiple rigs, stick with the same brand Power Supply Unit (PSU) as you can use extra cables on your other systems if needed (e.g., I use only EVGA G2 PSU’s so if I have extra VGA, SATA, or molex cables from one build, I can use them on another build).
As long as your system meets the general requirements and has at least one GPU with at least 3GB of RAM, you can mine Ethereum. Some Gaming laptops do have high-end cards, but with the considerable heat generated from mining, there could be other impacts to your laptop, so it’s best to go with a desktop build.
Virtualized environments that you can rent usually do not have a powerful dedicated GPU in them, or are simply not profitable if they do.
Step-by-Step Guide for Mining Ethereum on a PC
I’m going to assume you’re running Windows, so we’ll focus on mining Ethereum on that platform.
The whole process of getting a wallet set up, downloading your miner, configuring things in Windows, and setting up your batch file to run should take less than 10 minutes.
Step 1: Install Drivers
AMD GPUs: Go to amd.com, then choose “Support & Drivers”.
Enter your GPU information and click “Display Results”.
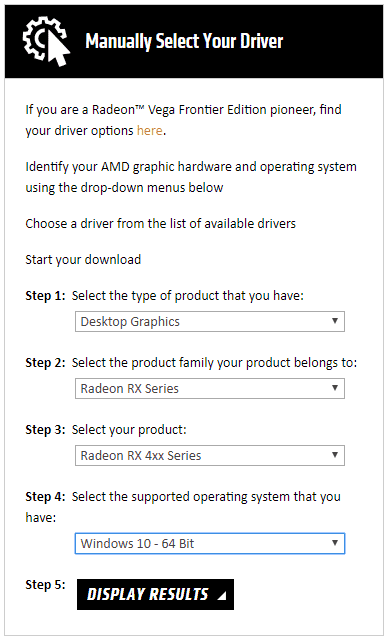
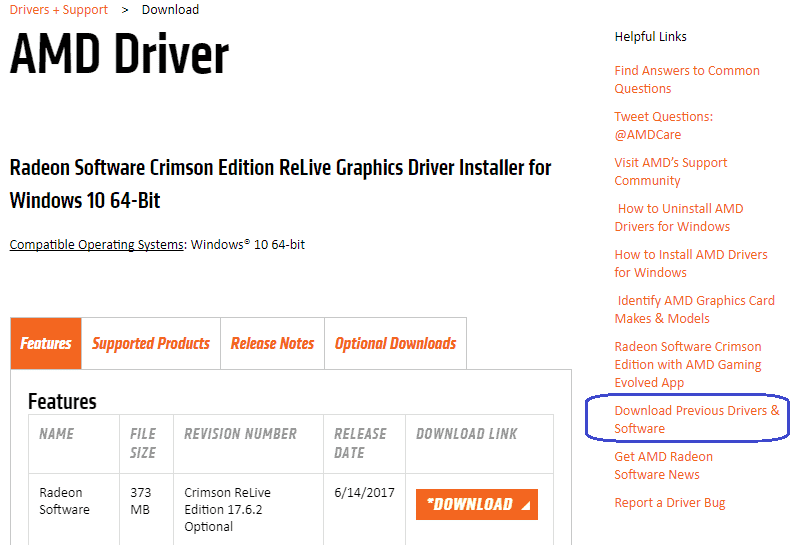
Click the Download button for the current driver. Alternatively, choose “Download Previous Drivers & Software” on the right-hand side to choose older versions. This is recommended since some driver versions are known as great for mining (based on your cards), e.g.:
- R9 and older – use 15.12
- RX 4XX Series – use 16.9.2 or 16.10.3
- RX 5XX Series – as these are newer, I’d recommend going with the current driver for now
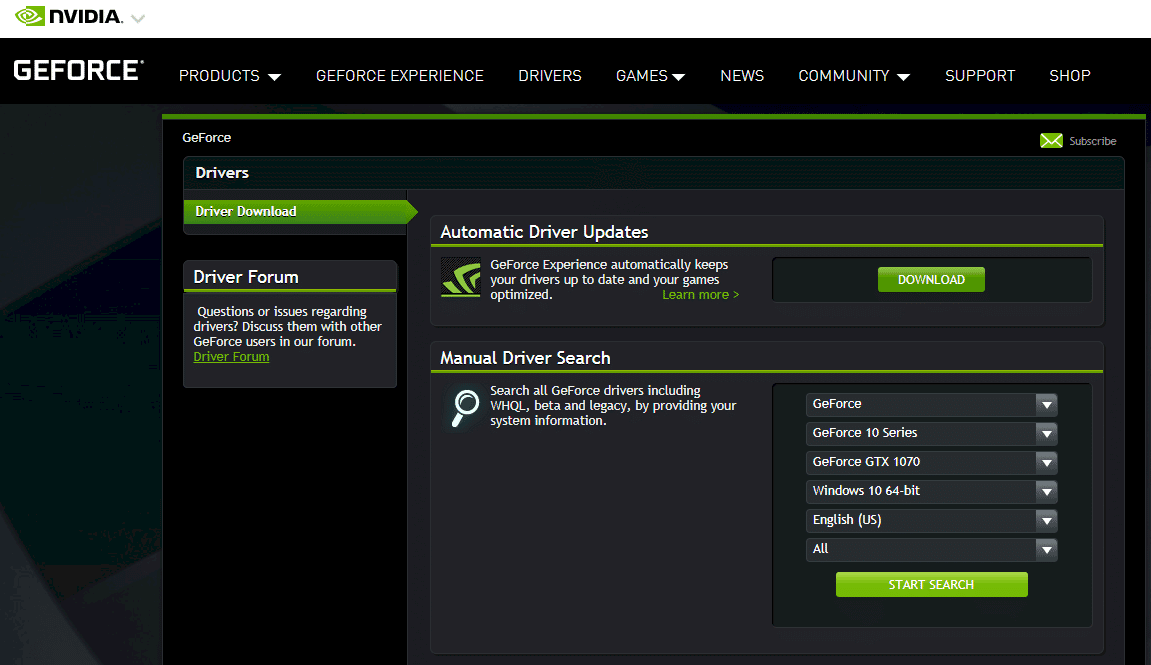
Nvidia GPUs: To get the latest Nvidia GeForce drivers, go to https://www.geforce.com/drivers. Enter your card info and click “Start Search”. Download the current driver version from the results.
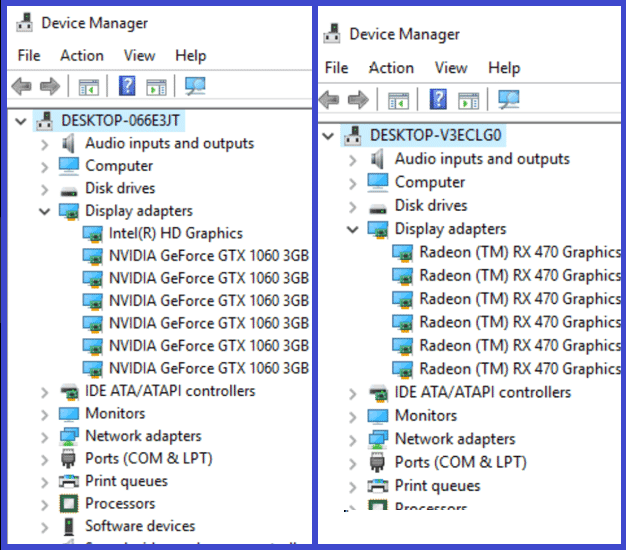
Install your GPU Drivers like you normally would (Next, next, Ok, etc.) and reboot. You know your GPUs are recognized correctly if you go into Device Manager (search in Windows search bar) and you don’t see any warning marks on your GPUs. It should look something like this:
Some miners have had success installing all GPUs at once and then installing the drivers. Others prefer a different method in which they install a single card first, install the drivers, and shut down the system.
While the system is off, they install the rest of the GPUs. Once done, they turn it back on and let them all be recognized by Windows. Notice that you’ll probably feel the system lagging and experience some flickers or brief black screens while each card is detected by Windows.
Bottom line, I’ve had success both ways, so if you run into an issue with one method, just delete the drivers and try the other method. If you do need to remove your drivers, use the DDU (Display Driver Uninstaller) program from Guru3d.com to remove everything cleanly and then start over.
Note: Steps 2-4 explain how to download the official Ethereum wallet, but that would require you to wait for the full Ethereum blockchain to sync. To skip this and get going much faster, jump down to step 4 (easy) and create a wallet using MyEtherWallet instead.
Step 2: Get an Ethereum Client (Advanced)
For a deeper explanation of how Ethereum wallets work, make sure to watch our Ethereum Whiteboard Tuesday episode about Ethereum wallets.
In this guide, I will show you how to install Mist, with its friendly and familiar GUI:

The Mist package contains the Ethereum wallet, which you’ll need to receive any mining profits. Mist also includes an Ethereum browser with various functions, such as messaging, a social network, and tutorials.
As a tip, these tutorials and the social network are helpful learning resources. Don’t be scared to ask the Ethereals if you experience difficulty with any part of this process.
To download Mist, head over to https://github.com/ethereum/mist/releases and select the most recent release:
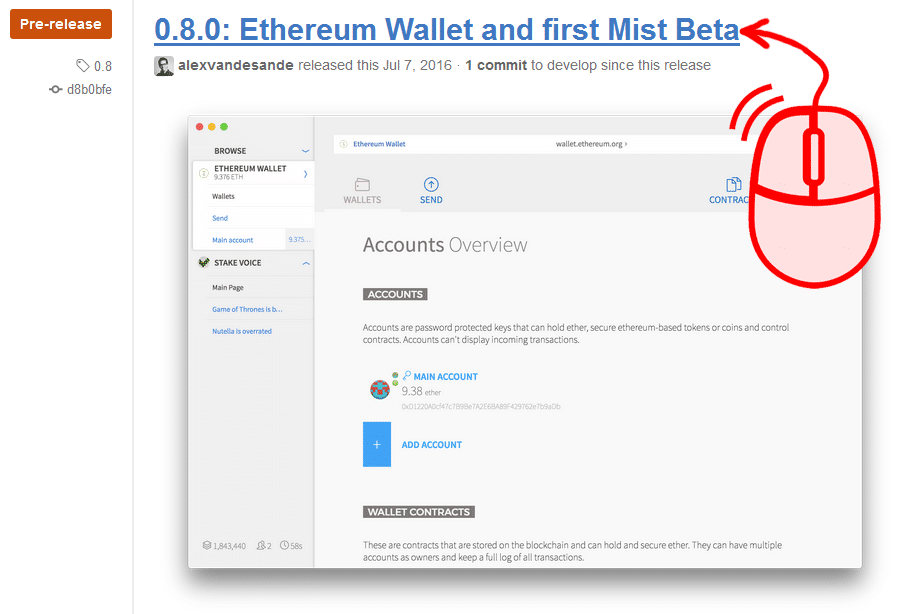
Select the latest release; it’ll have the highest number.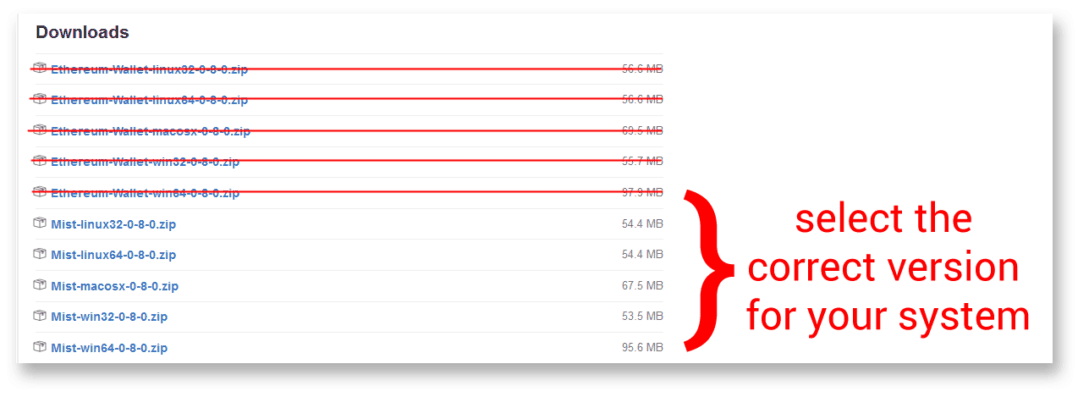 Scroll down to the Downloads. You can choose Mist or the standalone Ethereum wallet.
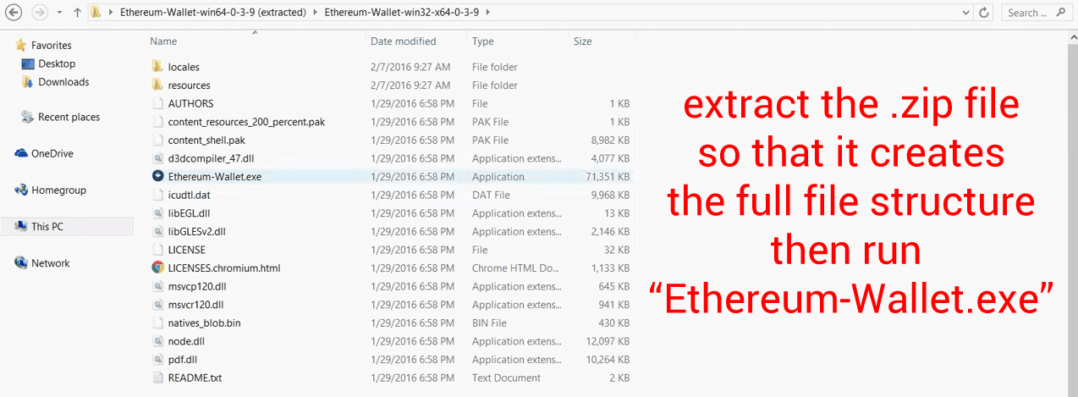
Choose a memorable download folder for the “Ethereum Wallet” zip file. Extract it with a suitable file extraction tool, and note to which folder it was extracted. Navigate to the new folder, locate and run the Ethereum app.
Download the Blockchain
The next step is just to wait, as the Ethereum blockchain downloads and syncs. It’s a really big file, so this process may take a while…
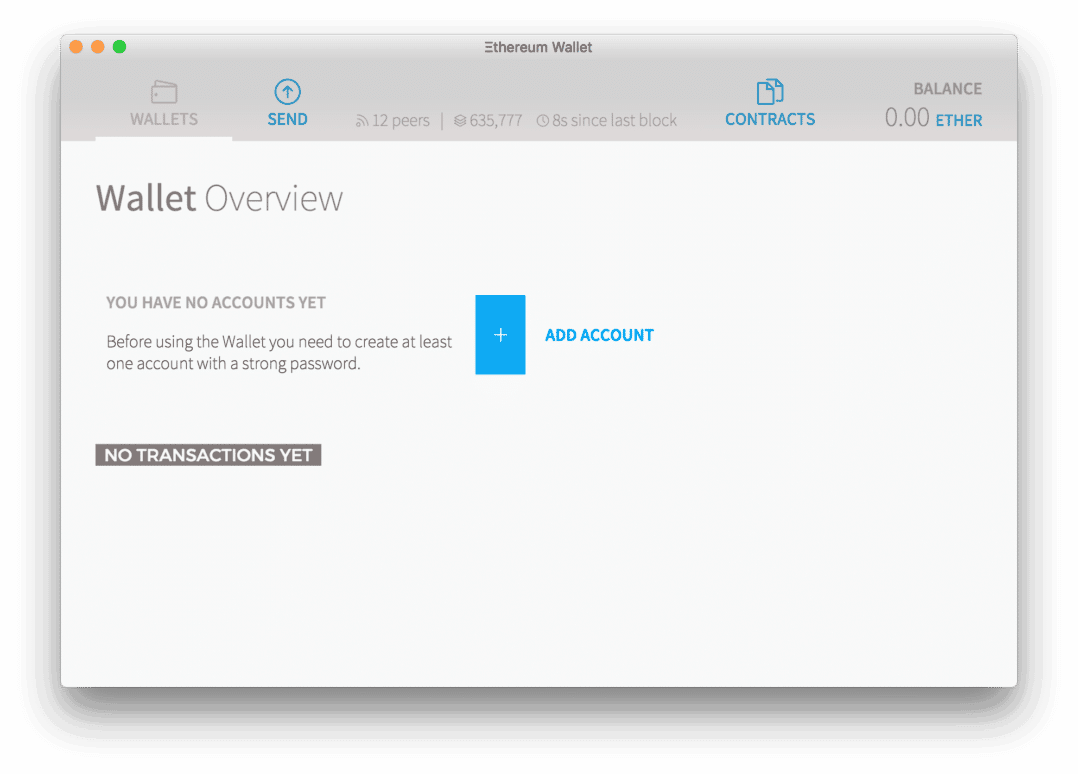
When it completes, spend a few minutes to familiarise yourself with the Mist app; the interface is fairly self-explanatory. The app isn’t yet fully polished, so expect a few bugs.
Set Up Your Wallet
Open the Ethereum wallet and generate a new account and contract-based wallet. This wallet will contain the payout address to which you’ll receive mining rewards from your pool or directly from the blockchain.
 Add your new account, give it a memorable mining name. Store the password securely.
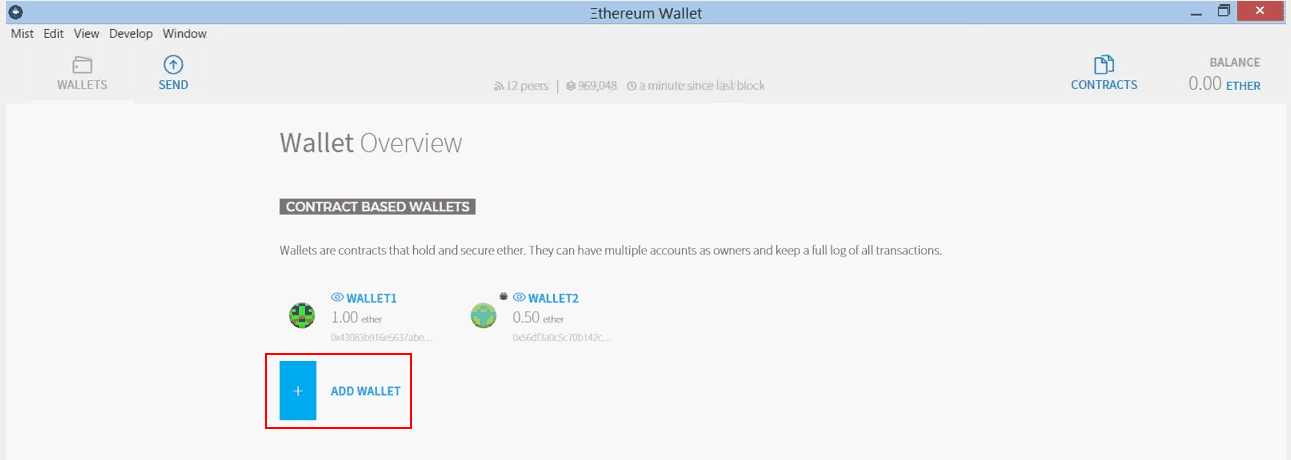
After generating the Account, add a wallet and write down or copy to a text file the unique address. This address will start with the characters “0x”. It’s necessary for receiving ETH mining rewards!
A Note on Geth:
Mist also contains Geth, a popular command-line interface. You may choose to get only the latest Geth app for your system; it’s able to perform all the functions of Mist (and more) from the command line.
Geth (an abbreviation for “go-ethereum”) allows your miner to interact more directly with the Ethereum network, but requires some programming knowledge.
As you become more proficient in Ethereum mining and coding, Geth will become more useful to you, but for now, this is not recommended as the easiest path to getting started with Ethereum mining.
Step 2: Get an Ethereum Client (Beginners)
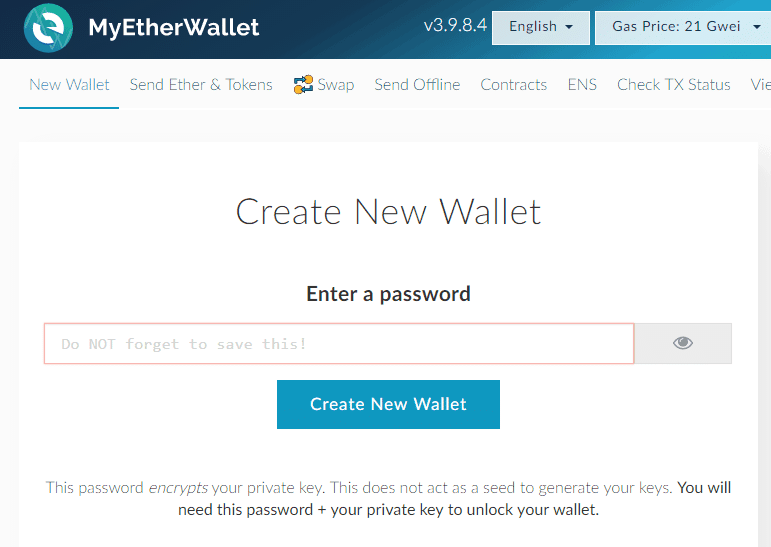
If you want to skip the long time it takes Mist to download the Ethereum blockchain, head over to MyEtherWallet.com
Please beware of phishing websites. Always triple-check the domain. The real site is MyEtherWallet dot com.
Enter a strong password and click “Create New Wallet”:
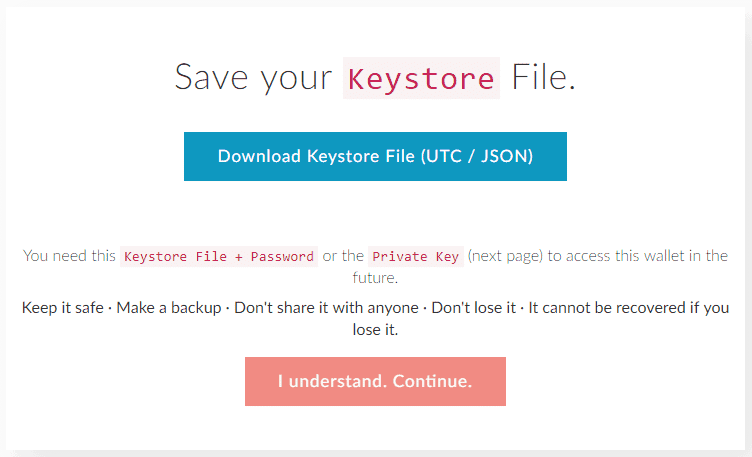
Download your “Keystore File” and click the “I understand. Continue.” button.
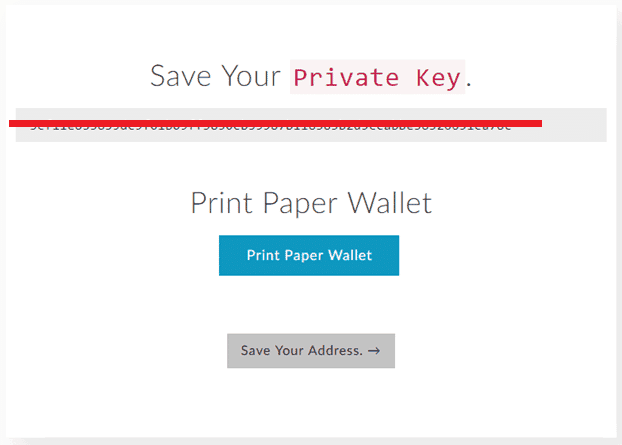
Save the private key provided.
A good practice is to open a notepad and enter your info – password, private key, and your Ethereum address (which you’ll get shortly). Save that text file along with your Keystore File in an encrypted file (using WinRar or a similar program).
Afterward, store a copy of that on a USB drive or cloud drive and delete the individual files (storing only the encrypted file digitally).
Click on Save Your Address and then select the “Keystore File” radio button. Click on “Select Wallet File”, browse to your recently downloaded Keystore File (which starts with “UTC…”), and select it.
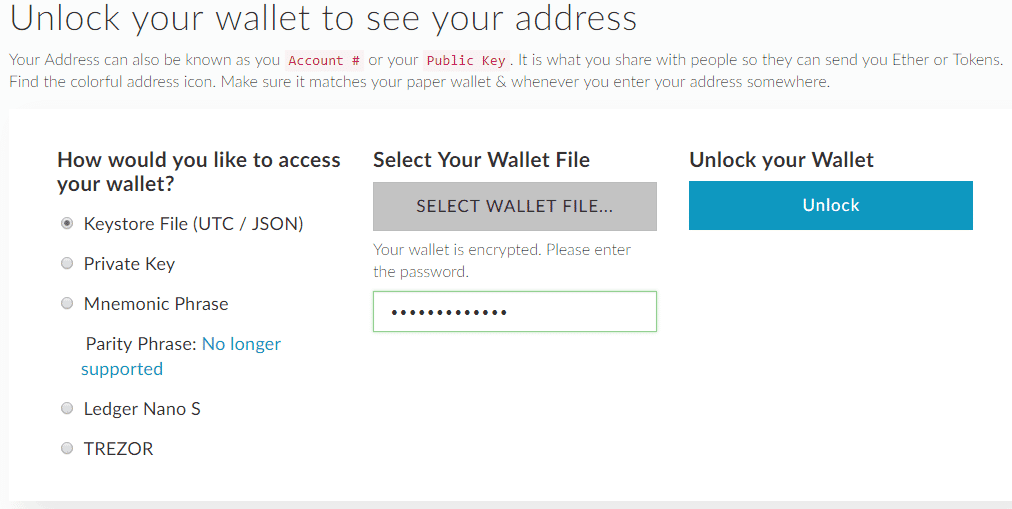
You’ll then be prompted to enter your password again

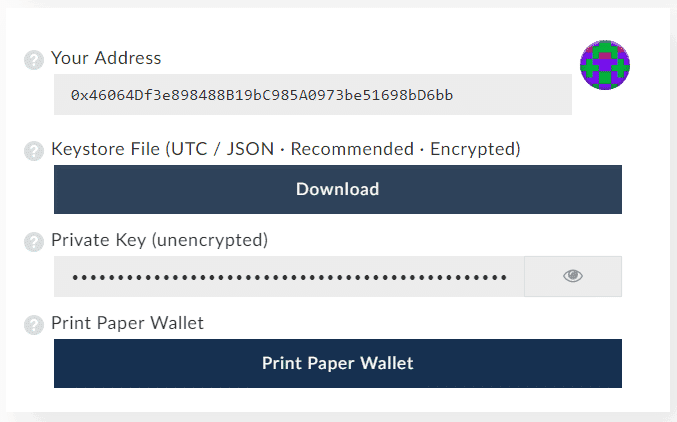
Once unlocked, you can scroll down and see “Your Address” – this is your Ethereum Wallet address that we will use for mining. Save it to a separate notepad text file and save it on your Desktop for easy access
It’s okay to share this address as this is how people will send you Ether and how you will receive your mining payouts, but never share your Private Key.
Step 3: Download Miner
We are going to be using the very popular Ethereum mining software called Claymore Miner.
Go to Claymore’s original Bitcointalk thread and download the current version from the Google or Mega download links he provides (don’t use other people’s links). The current version as of the time of this writing is 14.6, and you’ll want to get the Catalyst and CUDA version (not the Linux version).
Note, when downloading the Claymore Miner, Windows may issue a warning, but if you used Claymore’s download link, you can ignore this.
Once downloaded, extract the folder to your Desktop for easy access.
Step 4: Windows Settings
Some settings should be modified in Windows to get you ready for mining:
First, you don’t want your computer to go to Sleep as it will interrupt your mining, so go into your Power Settings and set it to “Never” turn off/sleep.
Next, modify your system page file and manually set it to 16384 MB (this is 16GB).
To minimize the disruptions to your mining and settings, you may also want to disable Windows Updates. If you feel more secure leaving them on, you can do so and just understand there are very frequent updates that sometimes reboot your system without your involvement, and therefore stop your mining.
Finally, if you are running Windows Defender or some other anti-virus program, add an exception to it so that it does not flag the Claymore mining executable “EthDcrMiner64.exe” as a virus or try to disable/delete it.
Step 5: Join a Mining Pool
The next step is to set up pool-mining, as solo-mining is unlikely to make you any Ethereum unless you have a warehouse full of GPUs.
Your first step will be to choose an Ethereum mining pool. There are plenty to choose from, but I recommend Nanopool or Etheremine. The home page or help section of a mining pool site most likely contains instructions on how to mine on their pool using the popular Claymore miner.
For this guide, we will use Etheremine. Directly on the home page of Ethermine.org you’ll see a section called “Stratum mode using Claymores Miner”. Open your Claymore miner folder on your desktop, right-click on the text file called “Start” and choose “Edit”.
Go to the Ethermine site, highlight and copy all the text in the first box under “Then start your miners by…”
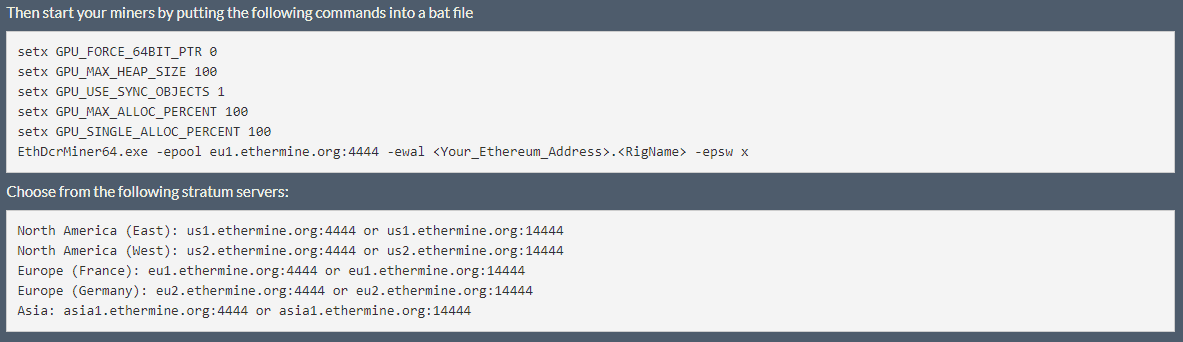
Depending on your location, you want to connect to the closest server to you and update the server string of text for the server:
:eu1.ethermine.org4444
To the most appropriate stratum server for you based on your location:
North America (East): us1.ethermine.org:4444 or us1.ethermine.org:14444

North America (West): us2.ethermine.org:4444 or us2.ethermine.org:14444

Europe (France): eu1.ethermine.org:4444 or eu1.ethermine.org:14444

Europe (Germany): eu2.ethermine.org:4444 or eu2.ethermine.org:14444

Asia: asia1.ethermine.org:4444 or asia1.ethermine.org:14444
In this example, I’ve updated mine for the US East Coast, so inside your Text file you should now have:
setx GPU_FORCE_64BIT_PTR 0
setx GPU_MAX_HEAP_SIZE 100
setx GPU_USE_SYNC_OBJECTS 1
setx GPU_MAX_ALLOC_PERCENT 100
setx GPU_SINGLE_ALLOC_PERCENT 100
EthDcrMiner64.exe -epool us1.ethermine.org:4444 -ewal <Your_Ethereum_Address>.<RigName> -epsw x
- Replace “<Your_Ethereum_Address>” with your Ethereum Wallet address (which starts with 0x…), copy that from your other text file, and paste it here.
- Replace “<RigName>” with any name you would like to create for your miner. We’ll use “MiningRig1” for our example, so you now have:
setx GPU_FORCE_64BIT_PTR 0
setx GPU_MAX_HEAP_SIZE 100
setx GPU_USE_SYNC_OBJECTS 1
setx GPU_MAX_ALLOC_PERCENT 100
setx GPU_SINGLE_ALLOC_PERCENT 100
EthDcrMiner64.exe -epool us1.ethermine.org:4444 -ewal 0x46064Df3e898488B19bC985A0973be51698bD6bb.MiningRig1 -epsw x
Save your file as a Batch file with the .bat extension. To do that, choose File > Save As and then in the box, choose a name for it, and then type “.bat” after the name. In the ‘Save as type’ box, make sure you select “All Files”, and then click Save.
Congrats! You now have a batch file ready to mine! Create a shortcut for the new Bat file and send it to your desktop. You can then delete the text file version of the file.

Step 6: Start Mining
Double-click your Bat file to start the miner. The miner will start, run the setx commands to set those environment variables, initialize each of your GPUs, build the DAG file on each of your GPUs, and start hashing away. Let it run for about 20 seconds and then click “s” to display your Hashing speed.
You can now use this information in the Ethereum mining calculator again to determine a more accurate representation of your earnings.
To monitor your earnings on the pool, go back to Ethermine.org and paste your wallet address into the Address window up at the top. Click the ‘Check Status’ button:

See Also:
FAQs
Can I mine with my CPU instead of a GPU?

Mining with GPUs is much faster than CPU mining, which is no longer profitable or worthwhile. Even entry-level GPUs are about 200 times faster than CPUs for mining purposes.
Can I use any ETH wallet address for mining?
You can use any ETH wallet address for mining, but some exchanges do not allow mining or do not allow very small deposits so double check with the site if mining directly to a web-deposit address. If the wallets in this post don’t work out for you, you can find a complete list of recommended Ethereum wallets here. Just make sure to check that the wallet you choose is suitable for mining.
What about cloud mining sites?
DO NOT buy into Ethereum cloud mining sites or related Investment programs. 99.9% of cloud mining sites are Ponzi schemes or fractional reserve Ponzi’s. Even though there are a few that have been around a long time, there have been no 3rd party audits of the hashing power sold, and profits are usually very low unless you are promoting heavily and getting others to join in (another red flag of Ponzi-related activity).
How much ETH can be mined?
Unlike Bitcoin, there is no limit to the amount of Ethereum that can be generated.
Why you can trust 99Bitcoins
Established in 2013, 99Bitcoin’s team members have been crypto experts since Bitcoin’s Early days.
Weekly Research
100k+Monthly readers
Expert contributors
2000+Crypto Projects Reviewed